
关于 tinyprobe
tinyprobe 是一款以 YAML 描述 API 端点和测试工作流的命令行工具,面向 API 开发与测试。它还提供桌面应用和 VS Code 扩展,并通过 MCP 工具让 Agent 检查、调用和运行测试。
主要功能
- 01用 YAML 描述端点和工作流
- 02检查、调用 API 并验证响应
- 03运行工作流并生成 JUnit 报告
- 04提供桌面应用与 VS Code 扩展
- 05为 Agent 提供内置指南
适用场景
- 01在本地验证 API 端点和响应
- 02在 CI 中运行端到端工作流
- 03将 Postman 集合转换为测试文件
MCP 相关
tinyprobe mcp 启动一个标准输入输出 MCP 服务,提供 guide、inspect、call 和 run 工具。call 与 run 会向后端发送请求。
配置
本地服务的配置在各客户端中通用,复制后粘贴到客户端的 MCP 配置文件即可。
docker run -i --rm ghcr.io/kikutano/tinyprobe:0.22.0本地服务需要在你的电脑上安装运行环境(如 Node.js 18+)。各客户端的配置文件位置不同,请参考客户端文档。
ghcr.io/kikutano/tinyprobe:0.22.0stdio工具
本地服务需要在你的电脑上运行后才能读取工具,维护者暂未提供工具列表。
详细介绍

tinyprobe


安装 · 应用 · VS Code 扩展 · 试用示例 · 工作流格式 · 编码 Agent 指南 · 路线图
厌倦了为 Postman 付费? 试试 tinyprobe:它快速、轻量,还能让你喜欢的 AI 编写 API 端点和端到端测试,然后针对你的环境运行测试。用 YAML 文件描述测试流程,确保 API 不再出故障。
准备从 Postman 迁移? 你的编码 Agent 可以转换集合,并告诉你哪些内容无法转换:一个提示词。
tinyprobe 是一款命令行 API 测试工具。只需用 YAML 描述一次端点,然后编写工作流,像调用函数一样调用这些端点、传递参数并检查响应。tinyprobe 是一个 Native AOT 单文件二进制程序:无需安装运行时,启动即用。

安装
Linux / macOS
curl -fsSL https://raw.githubusercontent.com/kikutano/tinyprobe/main/install.sh | sh
Windows(PowerShell)
irm https://raw.githubusercontent.com/kikutano/tinyprobe/main/install.ps1 | iex
或者从 Releases 下载适用于你平台的压缩包(win-x64、linux-x64、linux-arm64、适用于 Alpine 的 linux-musl-x64 和 linux-musl-arm64,以及 osx-arm64),并将 tinyprobe 放入你的 PATH。
Docker
docker run --rm -v "$PWD:/work" ghcr.io/kikutano/tinyprobe:0.21.0 run tinyprobe/workflows -e tinyprobe/env.local.yaml
该镜像使用发布版的 Alpine 二进制程序,并基于 Microsoft .NET 的 runtime-deps Alpine 镜像,支持 linux/amd64 和 linux/arm64;标签包括版本号(0.21.0)、次版本号(0.21)和 latest。当前文件夹会挂载为 /work。在容器内,localhost 指向容器自身:在 Linux 上添加 --network host,即可测试运行在本机上的 API;在 macOS 和 Windows 上,将 host.docker.internal 用作主机地址。添加 --user "$(id -u):$(id -g)",确保使用 --junit 写入的报告归你所有。
检查是否正常运行:
tinyprobe --version
更新
tinyprobe update
该命令会下载适用于你平台的最新版本、验证其 SHA-256 校验和,并原地替换二进制文件。tinyprobe update --check 只会告知是否有新版本。重新运行安装脚本也可以更新;设置 TINYPROBE_VERSION=0.10.0 可指定版本。
这款应用
tinyprobe-app 是为既不使用终端也不使用 VS Code 的用户打造的 tinyprobe:只需下载一个适用于 Windows、macOS 和 Linux 的小程序,即可在浏览器中打开。打开存放测试的文件夹,通过表单发送任意请求、运行工作流,并通过图示观察工作流的运行过程,了解值如何在步骤之间传递;还可以通过表单而非 YAML 修改端点和工作流。
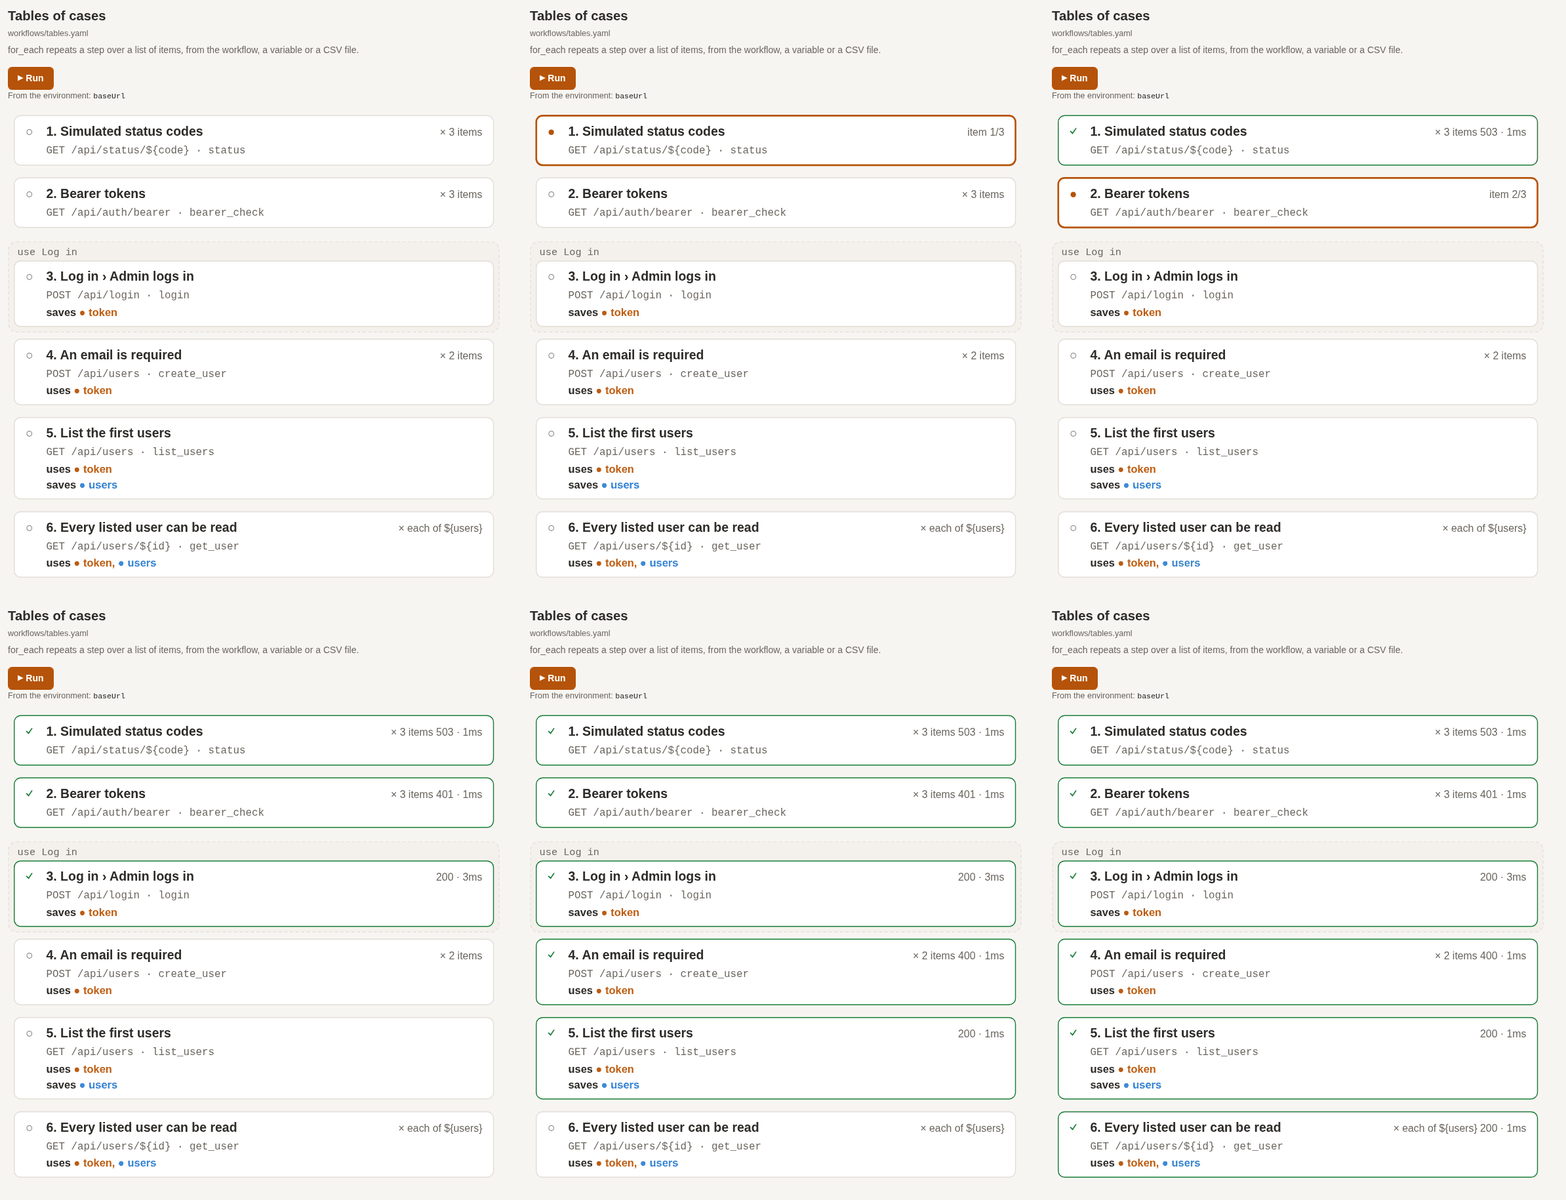
它使用相同的 YAML 文件并运行相同的 tinyprobe,因此你在应用中完成的操作,无需改动即可在终端和 CI 中运行。通过其发布页面下载。
VS Code 扩展
适用于 VS Code 的 tinyprobe 可直接在编辑器中运行相同的文件:
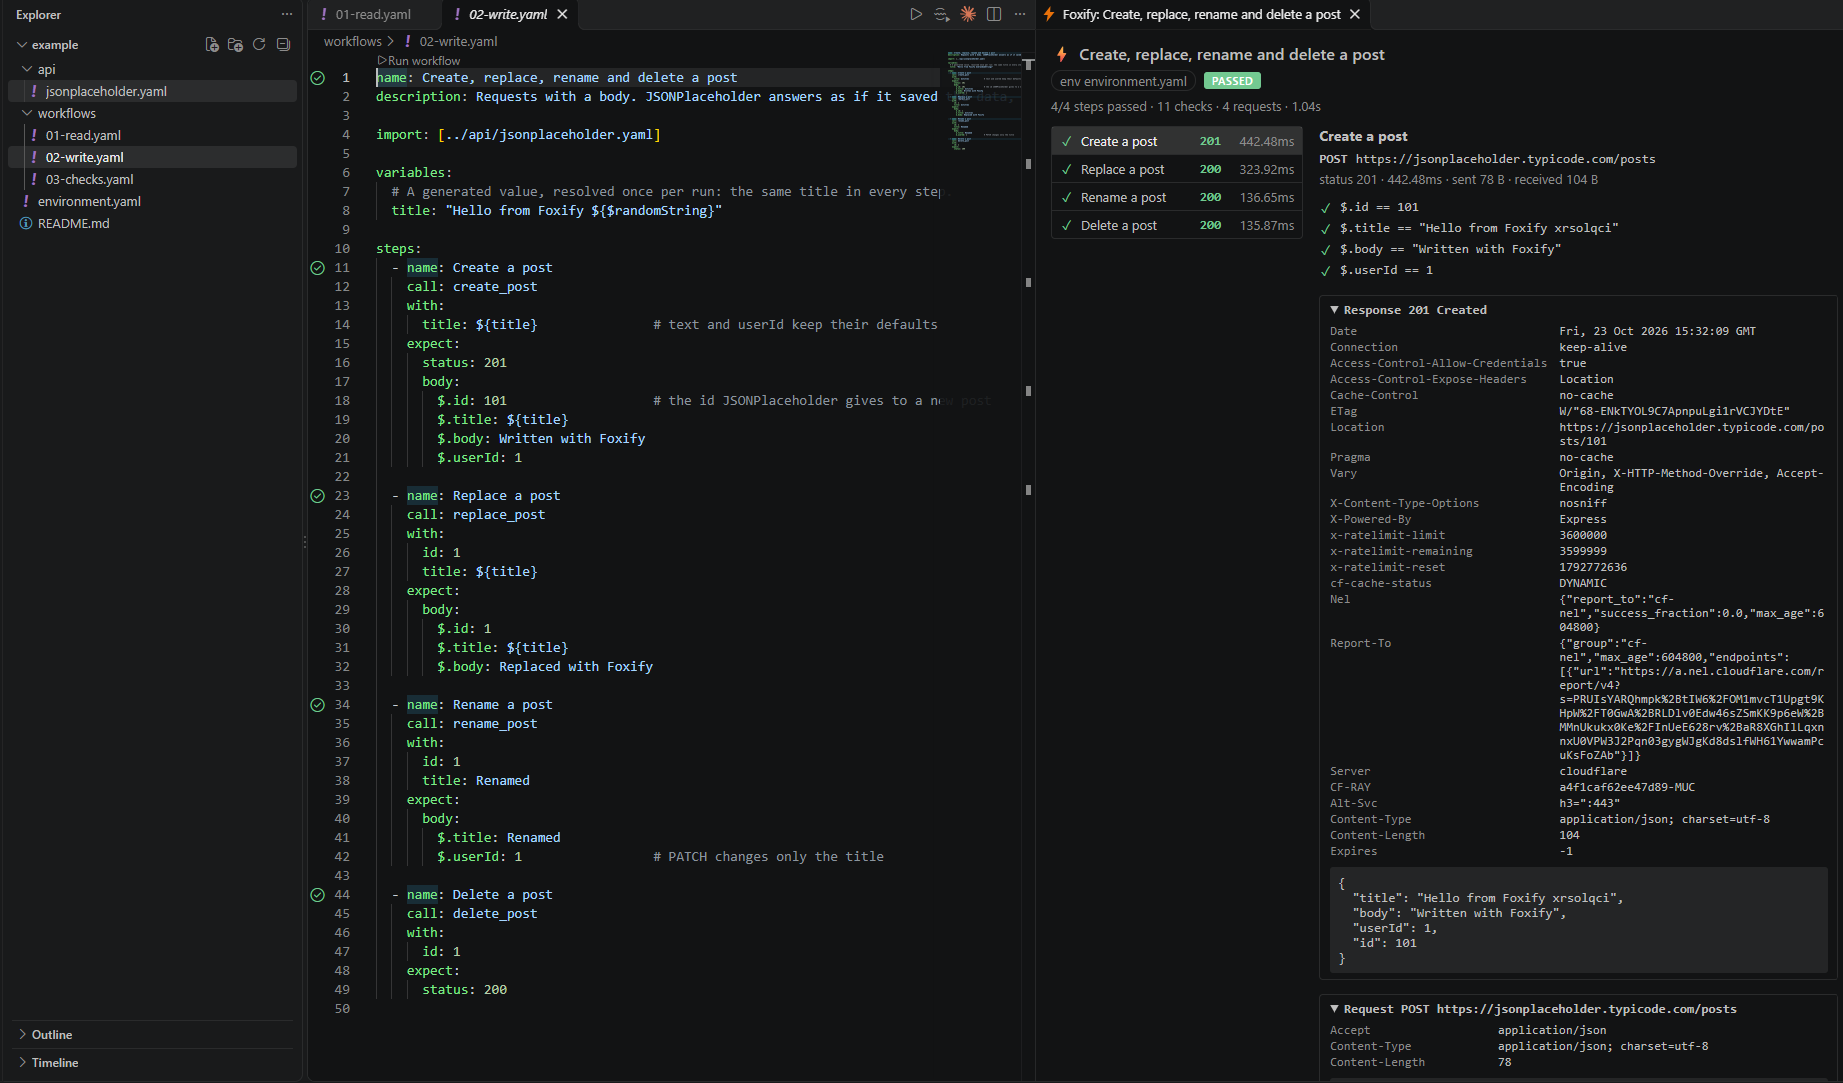
- 保存时会为问题添加下划线,并提供
tinyprobe的建议;输入时支持补全、悬停和跳转到定义; - 每个端点上方都有 ▶ Call:填写参数后即可查看响应;
- 支持 ▶ Run workflow,并可在 Test Explorer 中运行工作流;每个步骤和每个
for_each项目都作为单独的测试; - 每个步骤都有 Run to here:运行工作流直到该步骤,并显示其响应;
- 运行视图中显示每个步骤的请求和响应;
- 侧边栏包含调用历史记录,可重新发送之前的调用;还提供所选 env 文件的环境编辑器,并隐藏密钥;
- 为 Copilot 和编辑器中的其他聊天 Agent 提供 tinyprobe 工具;Generate Tests with AI / Migrate with AI 会将合适的提示词交给你的 Agent。
可从 VS Code Marketplace 安装;Cursor、Windsurf 和 VSCodium 用户可从 Open VSX 安装,也可以在终端中安装:
code --install-extension kikutano.tinyprobe-vscode
需要先按上述说明安装 tinyprobe。
试用示例
example/ 是一个小型完整项目,用于测试免费的模拟 REST API JSONPlaceholder:无需启动任何服务,也无需安装其他内容。三个简短且带注释的工作流展示了读取、写入以及各种检查类型。
git clone https://github.com/kikutano/tinyprobe.git
cd tinyprobe/example
tinyprobe run workflows/01-read.yaml -e environment.yaml
或者在 VS Code 中打开 example 文件夹,然后点击 ▶ Run workflow。参见 example/README.md。
快速开始
hello.yaml:
name: Hello tinyprobe
base_url: https://jsonplaceholder.typicode.com

endpoints:
  create_post:
    method: POST
    path: /posts
    body:
      title: ${title}
      userId: 1
  get_user:
    path: /users/${id}

steps:
  - name: Create a post
    call: create_post
    with:
      title: hello
    expect:
      status: 201
      body:
        $.id: 101
        $.title: hello
    save:
      postId: $.id              # available as ${postId} in the next steps

  - call: get_user
    with:
      id: 1
    expect:
      body:
        $.email: [email protected]
        $.address.city: { contains: Gwen }
      duration: { lt: 2s }
运行:
tinyprobe run hello.yaml
  ⚡ tinyprobe 0.21.0

  workflow : Hello tinyprobe
  file     : hello.yaml
  steps    : 2

  ✓ Create a post  POST   201   587.33ms  /posts
  ✓ get_user id=1  GET    200    76.89ms  /users/1

  checks..............: 100.00%  ✓ 6  ✗ 0
  steps...............: 2/2 passed
  http_reqs...........: 2  3/s
  http_req_duration...: avg=332.11ms min=76.89ms med=332.11ms max=587.33ms p(90)=536.28ms p(95)=561.8ms
  data_received.......: 559 B
  data_sent...........: 28 B
  workflow_duration...: 666.86ms

   PASSED   2 steps
某个步骤失败时,会列出该步骤的所有检查项及实际值,后续步骤不会运行:
  ✗ Wrong expectations  GET    200     4.73ms  /api/headers
      ✗ header X-Custom-Header == "something-else"  actual "hello-world"
      ✓ $.message contains "headers"
      ✗ duration < 1ms  actual 4.73ms
YAML 中的错误会在发送任何请求之前报告,并列出每个问题及其位置:
  ✗ The workflow is not valid (2 problems)

  tests/users.yaml:12:5: unknown endpoint 'logn' (did you mean 'login'?)
  tests/users.yaml:16:5: unknown key 'expcet' in a step (did you mean 'expect'?)
使用编码 Agent 生成测试
让编码 Agent(Claude Code、Cursor、Copilot、Codex 等)根据你的后端代码、Postman 集合或 OpenAPI 文档,为你编写 tinyprobe 文件。把 docs/llm-guide.md 提供给它:其中包含格式说明、容易出错的规则、分步操作流程和完整示例。然后粘贴下面的一个提示词。
tinyprobe guide 会从已安装的二进制文件输出相同的指南,因此始终与你的版本一致,也支持离线使用。如果 Agent 无法打开链接,就把文件粘贴到聊天中。
在仓库根目录运行 tinyprobe init。它会创建指南中的 tinyprobe/ 文件夹(包括 api/、workflows/、sequences/ 和环境文件),将包含凭据的环境文件添加到 .gitignore,并在 AGENTS.md 中添加一节,要求每个编码 Agent 在修改测试前运行 tinyprobe guide。它不会覆盖任何文件。
Agent 可以检查自己的工作:无效文件会在发送任何请求之前报告错误,并给出 file:line:column 和修改建议;检查失败时会显示实际值。
向 Agent 提供 tinyprobe 工具(MCP)
tinyprobe mcp 是一个 MCP 服务:你的 Agent 可以使用 guide、inspect、call 和 run 工具,无需使用 shell,通过 JSON 参数和 JSON 结果进行交互。只需添加一次:
claude mcp add tinyprobe -- tinyprobe mcp # Claude Code (--scope project shares it in .mcp.json)
{ "servers": { "tinyprobe": { "type": "stdio", "command": "tinyprobe", "args": ["mcp"] } } }
这是 VS Code 的 .vscode/mcp.json。Cursor 会读取 .cursor/mcp.json,内容为 { "mcpServers": { "tinyprobe": { "command": "tinyprobe", "args": ["mcp"] } } };Codex 会读取 ~/.codex/config.toml,内容为 [mcp_servers.tinyprobe]、command = "tinyprobe"、args = ["mcp"]。call 和 run 会向你的后端发送请求,因此 Agent 可能会在使用前征求你的同意。工具及其结果详见 docs/protocol.md。
它已作为 io.github.kikutano/tinyprobe 列入 MCP Registry,并以 Docker 镜像作为其软件包,因此支持读取注册表的客户端可以从中添加它。
Agent 软件包
agents/ 中包含可直接使用的说明,可引导 Agent 运行 tinyprobe guide:包含技能和 MCP 服务的 Claude Code 插件、Cursor 规则、Copilot 说明,以及 llms.txt。在 Claude Code 中:
/plugin install tinyprobe --marketplace kikutano/tinyprobe
根据后端代码生成
Read https://raw.githubusercontent.com/kikutano/tinyprobe/main/docs/llm-guide.md (or run `tinyprobe guide`)
and follow it: look at this backend's routes, authentication and seed data, write the tinyprobe API
file and workflows in tinyprobe/, then run them with tinyprobe until they pass. Put credentials only in
tinyprobe/env.local.yaml and add it to .gitignore. Tell me which failures look like backend bugs.
根据 Postman 集合生成
在 Postman 中,导出集合(Collection v2.1)和每个环境,并将文件放入仓库,例如 postman/。然后:
Read https://raw.githubusercontent.com/kikutano/tinyprobe/main/docs/llm-guide.md (or run `tinyprobe guide`)
and follow its section on migrating from Postman: convert the collection and the environments in postman/
to tinyprobe files in tinyprobe/, one folder at a time, and run each workflow until it passes. Put secrets
only in tinyprobe/env.local.yaml and add it to .gitignore. Write tinyprobe/MIGRATION.md with what you
converted, what you skipped and why, and tell me which failures look like backend bugs.
同一请求的不同变体(“Login”“Login - wrong password”)会合并为一个端点,通过不同参数调用;脚本保存的值则会变成 save。暂不支持转换的内容(例如计算签名的脚本、pm.sendRequest)不会被猜测:Agent 会将其列在 MIGRATION.md 中,让你清楚测试未覆盖哪些内容。同一提示词也适用于导出的 Insomnia、Bruno 或其他 API 工具文件:只需注明文件夹和工具名称。
根据 OpenAPI 文档生成
Read https://raw.githubusercontent.com/kikutano/tinyprobe/main/docs/llm-guide.md (or run `tinyprobe guide`)
and follow it, starting from the OpenAPI document openapi.yaml: write one tinyprobe endpoint per operation
and workflows that check the documented status codes and response fields, then run them against the
local backend until they pass. Take test values from the seed data, not from the examples in the
document. Put credentials only in tinyprobe/env.local.yaml and add it to .gitignore. Tell me where the
backend does not do what the document says.
用法
  tinyprobe run <workflow.yaml | folder>... [options]
  tinyprobe call <file.yaml> <endpoint> [--with name=value]... [options]
  tinyprobe inspect <file.yaml> [--json [--source]]
  tinyprobe init [folder] [--base-url <url>]
  tinyprobe update [--check] [--force]
  tinyprobe guide       Print the guide for coding agents (LLMs) that write tinyprobe files.
  tinyprobe mcp         MCP server on stdin/stdout: the tools guide, inspect, call and run, for agents.
  tinyprobe schema      Print the JSON Schema of tinyprobe files, for editors.
  tinyprobe --help
  tinyprobe --version

'run' runs workflows. A folder is read recursively: every YAML file with a top-level
'steps' key is a workflow, other files are skipped. With several workflows, each one
starts from zero, a failing one does not stop the others, and a summary comes last.
'call' sends one request to an endpoint of an API or workflow file and prints the response.
'inspect' validates a file and lists its endpoints, variables and steps.
'init' creates the tinyprobe/ folder, the .gitignore lines and an AGENTS.md section for
coding agents, in the current folder or the one given. It never overwrites a file.

Options for 'run' and 'call':
  -e, --env <file>        Environment file (YAML) with initial variables, e.g. baseUrl, apiKey.
  --var <name=value>      Set a variable, over the environment file. Repeatable.
  --with <name=value>     ('call' only) An argument of the endpoint, like a step's 'with'. Repeatable.
  --reporter <name>       console (default) or ndjson: one JSON event per line, for tools.
  --junit <file>          ('run' only) Also write a JUnit XML report, for CI servers.
  --to <step>             ('run' only, one workflow) Run up to this step, included, and stop:
                          its number, as 'inspect' lists the steps, or its name.
  -v, --verbose           Print variables, requests and responses while running.
  --no-color              Disable colors (also honored: the NO_COLOR environment variable).

Values of --var and --with are typed like YAML: 42 is a number, true a boolean,
'"42"' a string, '[a, b]' a list.

Options for 'inspect':
  --json                  Print JSON, for tools.
  --source                With --json, also the file as written and where its blocks are, for editors.
  --no-color              Disable colors.

Options for 'init':
  --base-url <url>        baseUrl of the env files (default: http://localhost:8080).

Options for 'update':
  --check                 Only tell whether a newer version is available.
  --force                 Reinstall the latest version, also over a development build.

  -h, --help              Show this help.
  --version               Show the version.

Exit codes ('run', 'call', 'inspect'):
  0  all steps passed ('call': a response was received; 'inspect': the file is valid)
  1  at least one step failed (several workflows: at least one workflow failed)
  2  invalid arguments, file not found, invalid file, or a folder without workflows
工作流会在第一个失败步骤处停止。传入文件夹或多个文件时,tinyprobe run 会运行每个工作流,即使前一个工作流失败也会继续,最后汇总所有工作流的结果;退出代码 0 表示所有工作流均已通过:
tinyprobe run tinyprobe/workflows -e tinyprobe/env.local.yaml
文件夹会递归读取,且只运行工作流:其中的 API 文件和环境文件会跳过。每个工作流都会从零开始,因此一个工作流中保存的值不会被下一个工作流看到。退出代码让 tinyprobe 易于用于 CI。当输出目标不是终端(如 CI 日志、管道)时,旋转指示器会关闭,并且每个步骤都会单独占一行显示。
在 CI 中运行
运行整个文件夹,并生成 JUnit 报告,供 CI 服务器在测试选项卡中显示:每个步骤都是一项测试,包含其文件和行号;失败的步骤会显示请求行以及每项检查的实际值。报告不包含标头和正文,因为 CI 服务器会保存报告,而请求中可能包含机密信息。
使用此仓库的 Action 在 GitHub Actions 中运行:
- uses: actions/checkout@v4
- uses: kikutano/[email protected]      # installs tinyprobe 0.21.0
  with:
    path: tinyprobe/workflows
    env-file: tinyprobe/env.ci.yaml
    vars: |
      token=${{ secrets.API_TOKEN }}
它会安装同一版本的二进制文件(并验证校验和)、运行文件夹、生成 tinyprobe-report.xml,在作业页面上显示摘要,并在工作流文件中对应的行、运行页面和拉取请求中将每个失败的步骤标记为错误。输入项:path(文件或文件夹)、env-file、vars(每行一个 name=value;日志中只显示名称)、version、junit、summary、annotations,以及用于指定运行器上已有二进制文件的 tinyprobe-path。支持在 Linux、macOS 和 Windows 运行器上运行。使用 actions/upload-artifact 上传报告,以便留存。
使用 Docker 镜像在 GitLab CI 中运行:
api-tests:
  image:
    name: ghcr.io/kikutano/tinyprobe:0.21.0
    entrypoint: [""]     # GitLab runs the script in a shell, not through tinyprobe
  script:
    - tinyprobe run tinyprobe/workflows -e tinyprobe/env.ci.yaml --junit reports/tinyprobe.xml
  artifacts:
    when: always
    reports:
      junit: reports/tinyprobe.xml
同一镜像也适用于任何在容器中运行作业的 CI(Bitbucket Pipelines、CircleCI、Woodpecker、使用 Docker 的 Jenkins)。如果作业需要使用自己的镜像,请改为安装二进制文件:curl -fsSL https://raw.githubusercontent.com/kikutano/tinyprobe/main/install.sh | TINYPROBE_VERSION=0.21.0 sh,然后运行 ~/.local/bin/tinyprobe。在 Alpine 上,脚本会选择 Alpine 版本。
固定版本(Action 的标签、镜像标签或 TINYPROBE_VERSION),这样新版本发布时不会在你尚未选择的情况下更改流水线。将凭据保存在 CI 的机密信息中,并根据这些信息写入 env.ci.yaml,或通过 --var 传入。
探索 API
inspect 会列出文件定义的内容,call 会发送单个请求并输出完整响应,无需编写工作流:
tinyprobe inspect docs/example/api/testserver.yaml
tinyprobe call docs/example/api/testserver.yaml status --with code=404 -e docs/environment.yaml
call 接受任何状态码,因此 404 会显示出来,而不会被报告为失败。参数的验证方式与步骤的 with 相同:缺少必需参数或参数名称拼写错误都会报错。
要查看某个流程步骤——该步骤需要令牌以及此前步骤的 ID——请使用 --to 运行工作流直到该步骤:指定 inspect 列出的步骤编号或步骤名称。此前的步骤会再次运行,因此运行之间不会保留状态;之后的步骤不会运行,也不会计入步骤数。
tinyprobe run docs/example/workflows/users.yaml -e docs/environment.yaml --to 3 -v
tinyprobe run docs/example/workflows/users.yaml -e docs/environment.yaml --to "Only active users"
在 VS Code 中,每个步骤上方的 ▶ 运行至此处 会执行相同操作,并显示该步骤的响应。
在其他工具中使用 tinyprobe
inspect --json 和 run --reporter ndjson(以及 call)会为程序输出 JSON,可供编辑器、CI 仪表板和本地 UI 使用。格式采用版本化管理,并记录在 docs/protocol.md 中。
tinyprobe run docs/example/workflows/users.yaml -e docs/environment.yaml --var baseUrl=http://127.0.0.1:5122/ --reporter ndjson
工作流格式
端点和测试位于不同文件中,因此相同的端点可供多个工作流使用:
# api/server.yaml: endpoints only, no expectations
base_url: ${baseUrl}
auth:
  bearer:
    Authorization: "Bearer ${token}"
  service:                   # or basic: { username, password }
    oauth2:                  # OAuth2 client credentials: the token is fetched and reused for you
      token_url: ${baseUrl}oauth/token
      client_id: ${clientId}
      client_secret: ${clientSecret}
endpoints:
  login:
    method: POST
    path: /api/login
    params:
      username: admin        # default
      password:              # required
    body:
      username: ${username}
      password: ${password}
  get_user:
    path: /api/users/${id}
    auth: bearer
  upload_avatar:
    method: POST
    path: /api/users/${id}/avatar
    auth: bearer
    params: { id:, avatar: }
    multipart:               # a file upload; form: sends an urlencoded form
      description: Profile picture
      avatar:
        file: ${avatar}
# workflows/users.yaml: steps that call the endpoints
name: Users
import:
  - ../api/server.yaml
  - billing: ../api/billing.yaml     # another service: its endpoints are billing.<name>
steps:
  - call: login
    with: { password: password }
    save: { token: $.access_token }

  - call: get_user
    with: { id: 1 }
    expect:
      status: 200
      headers:
        Content-Type: { contains: json }
      body:
        $.email: [email protected]
        $.orders: { gt: 0, lt: 100 }       # several conditions on one value: all must pass
        $.name: { eq: Gaetano, contains: Gae }
        $.role: { in: [admin, owner] }     # OR: one of these values
        $.deletedAt: { any: [ null, { exists: false } ] }   # OR: one of these conditions

  - sleep: 500ms
| 步骤中 | 描述 |
|---|---|
call / with | 要调用的端点及其参数。 |
use | 在此处运行一组共享步骤(例如登录),如 use: ../sequences/log-in.yaml,并使用 with 传入其参数。 |
expect.status | 预期状态码,或状态码列表([200, 204]);不指定时,接受任何 2xx 状态码。 |
expect.body | 使用 JSONPath 进行检查:普通值表示相等;运算符包括 eq、ne、gt、gte、lt、lte、exists、contains、matches(正则表达式,例如 { matches: '^ORD-[0-9]+$' })、schema(JSON Schema 文件、OpenAPI 文档中的 Schema,或直接编写的 Schema:$: { schema: openapi.yaml#/components/schemas/User })。可在同一个值上组合多个条件,例如 { gt: 0, lt: 10 }:所有条件都必须通过。OR 条件可使用 in: [a, b](值为其中之一)或 any: [ { lt: 0 }, { gt: 100 } ](满足其中一个条件)。 |
expect.headers | 检查响应标头。 |
expect.cookies | 检查 Cookie,例如 { sid: { exists: true } }。每个工作流都会保留服务设置的 Cookie,并在后续请求中发送。 |
expect.duration | 响应时间,例如 { lt: 500ms }。 |
save | 保存响应正文中的值供后续步骤使用,或保存 Cookie 的值:csrf: { cookie: XSRF-TOKEN }。 |
for_each | 为每个项目重复调用一次:项目可以是 { arguments } 列表、变量(${users}),也可以是 CSV 或 JSON 文件。每个项目都可以设置预期状态:status: ${status}。 |
until | 轮询:重复调用,直到条件通过,例如 until: { body: { $.status: Confirmed }, every: 1s, timeout: 30s }。 |
sleep | 暂停,例如 sleep: 2s。 |
${name} 会依次读取步骤参数、已保存的值、环境文件(-e)和工作流的 variables。以 $ 开头的名称会自动生成:${$uuid}、${$timestamp}、${$randomString}、${$now+2h}、${$today+1d};在 variables 中定义一个名称,即可在每个步骤中重复使用相同的值。完整参考请见 docs/workflow-format.md。
测试服务示例
docs/example/ 是一个完整项目,使用该格式的所有功能来测试一个可通过一条命令启动的服务,也是 CI 运行的项目:包含两个 API 文件和八个工作流,覆盖身份验证(Bearer、API 密钥、Basic、OAuth2)、CRUD、嵌套 JSON、AND/OR 检查、查询字符串、标头、状态码、慢响应、表单和文件上传、正则表达式和 JSON Schema 检查、Cookie 会话、使用 for_each 的用例表、使用 until 进行轮询、生成值、通过序列共享登录,以及命名导入。其 README 会逐个工作流介绍这些内容。若想快速了解且无需启动任何服务,example/ 会调用公共 API。
# terminal 1: the test server on http://localhost:5122 (only your machine reaches it)
docker run --rm -p 127.0.0.1:5122:5122 ghcr.io/kikutano/tinyprobe-testserver
# terminal 2: run a workflow, or all of them
tinyprobe run docs/example/workflows/users.yaml -e docs/environment.yaml
tinyprobe run docs/example/workflows -e docs/environment.yaml
如果没有 Docker,可使用 .NET SDK 从源代码启动:dotnet run --project tests/Tinyprobe.RealServer.Tests。无需重启服务,即可反复运行这些工作流。
从源代码构建
需要 .NET 10 SDK。Native AOT 还需要平台工具链:Windows 上的“使用 C++ 的桌面开发”工作负载、Linux 上的 clang 和 zlib1g-dev,以及 macOS 上的 Xcode 命令行工具。
git clone https://github.com/kikutano/tinyprobe.git
cd tinyprobe
dotnet test Tinyprobe.slnx

# run without installing
dotnet run --project src/Tinyprobe.Cli -- run docs/example/workflows/users.yaml -e docs/environment.yaml

# build the native binary (use your RID: win-x64, linux-x64, linux-arm64, osx-arm64)
dotnet publish src/Tinyprobe.Cli/Tinyprobe.Cli.csproj -c Release -r linux-x64 -o publish
路线图
请参见 ROADMAP.md。
许可证
MIT。请参见 License.md。
评论
一个开放协议,规定了 AI 应用如何以统一方式连接外部工具与数据源。客户端负责与模型对话,MCP 服务负责提供工具、资源和提示模板,两者通过标准消息通信,同一个服务可以被不同客户端复用。